Instructions for applying your custom materials:
- Go to your inventory and make a copy of your tail folder
The folder should be called: Cynefin ~ Nemissa Base Set
Right click the folder, then click copy.
Right click the place you’d like to put your copy, and click paste.
Rename the folder: Cynefin ~ Nemissa Base Set (Scale Fade)

- Wear the tail and fins from the new folder.
Right click the tail, and click add.
Right click the fins you’d like to wear, and click add.
- Add the tail BOM of your choice from the Cynefin Nemissa folder, or any other BOM tail applier of your choice.
Now we’re going to get in to the editing.
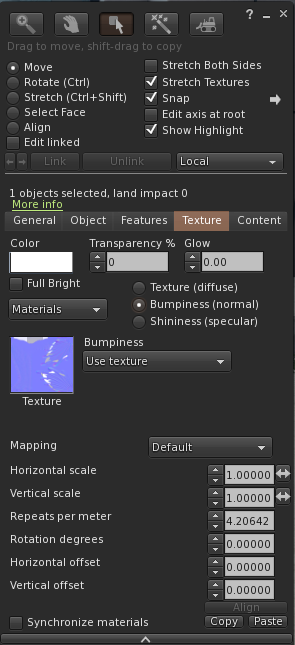
- Adding Bumpiness Materials to your tail.
Right click your tail, then click edit.
The edit window should appear.
Click on the texture tab.
There are three radial buttons, click on Bumpiness (normal)
Click on the texture preview box.
This should bring up a Pick: Texture window alongside an inventory list.
In the list find the file called: mermade. // Scale Fade TAIL NORM
Click this file in the list, then click okay.
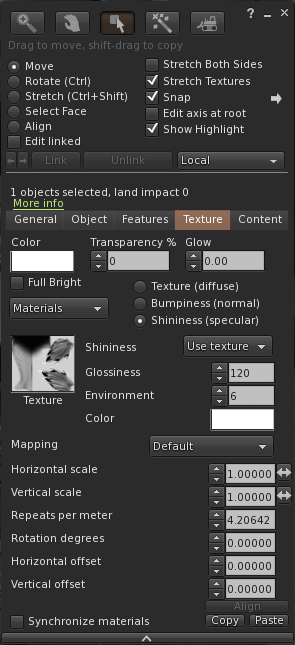
- Adding Shininess Materials to your tail.
Now click on the Shininess (specular) radial button.
Click on the texture preview box.
Again this should bring up a Pick: Texture window beside an inventory list.
In the list find the file called: mermade. // Scale Fade TAIL SPEC
Click this file in the list, then click okay.
Then close the edit window.
- Enhancing the Alpha Masking on your tail.
Right click your tail, then click edit.
The edit window should appear.
Click on the texture tab.
There are three radial buttons, click on Texture (diffuse).
There is a dropdown menu, under the words Alpha Mode.
Click on this menu, and select Alpha Masking.
A Box should appear underneath the words Mask Cutoff.
In this box, type 120 and hit the return key.
Then close the edit window.
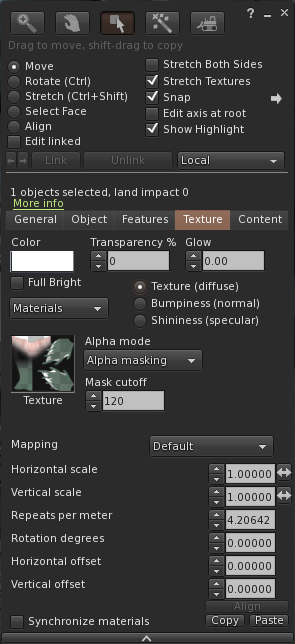
You’ve applied the Materials to your tail, and enhanced the Alpha Masking!
Now we need to repeat the Materials Adding process but for your fins.
If you have chosen to wear individual fins, you will only need to do this for the Pelvic Fins. If you have chosen to wear all of the fins linked together, you will do this for the All Fins Linked.
- Adding Materials to your fins.
Right click your Pelvic Fins or All Fins Linked, then click edit.
The edit window should appear.
Click on the texture tab.
There are three radial buttons, click on Bumpiness (normal)
Click on the texture preview box.
This should bring up a Pick: Texture window beside an inventory list.
In the list find the file called: mermade. // Scale Fade FINS NORM
Click this file in the list, then click okay.
Now click on the Shininess (specular) radial button.
Click on the texture preview box.
Again this should bring up a Pick: Texture window beside an inventory list.
In the list find the file called: mermade. // Scale Fade FINS SPEC
Click this file in the list, then click okay.
- Add your new Scale Fade by Mermade. BOM layer from the folder you found this notecard in.
This must be the last BOM layer you add to your tail for your Scale Fade to work properly.
If you picked up the fatpack, from here you can just change which tone of Scale Fade you’re wearing on your tail as you change your Velour Ipanema body skin.
Congrats, you’re all done and ready to swim!